
JDeveloper: How to setup and use a converter
In this post I show how to setup the server side part of a converter and how to use it in an application. Converters can have a client side too and all af:converter do have one. For a nice sample on what you can do with client side converters see ADF: Smart Input Date Client Converter. The big difference is that the client side converter is done on the client side with JavaScript and no server round trip is done for the conversation.
Why are converters needed at all?
Sometimes the data you get from a source like the database table is not in a format you like to show to the user. Common cases are showing strings in special formatting, e.g. social security numbers or phone numbers. You can use converters to show the content of clob and blob columns in the UI too.
The ADF framework provided some converters out of the box:
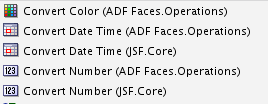
These can be used without the need to program anything.
What is missing from the out of the box converters is one which can be used to format a string.
One thing to remember that the new format should only be used in the UI to show the data in a specific format. You normally don’t want to store it in this special format.
We create a converter which exchanges each uppercase character ‘B’ in a string with the string “-Z-”. The sample is not very useful, but it shows what can be done with converters.
Use Case
A string can contain any character. However when the string is shown on the UI there should be no ‘B’ visible. Instead of the ‘B’ we should show ‘-Z-’. This should only be done when the string is visible on the UI. When the string is stored in the db or some other place it should be stored with the ‘B’.
Implementation
I used JDev 11.1.1.7.0 for this sample, which is the oldest JDev version I have access to. The steps to create a converter should be almost equal in all versions, but I deliberately choose the oldest JDev I have so that other users with other version should have no problem migrating this sample to their version.
The final sample can be downloaded from GitHub at BlogConverterSample.
Model Project
We start by creating a fresh ADF Web Application. If you want a detailed description on how to do this, you can follow Writing Reproducible Test Cases: Why and How. For the model part I only use one DB table, the EMPLOYEES table. The resulting model project looks like
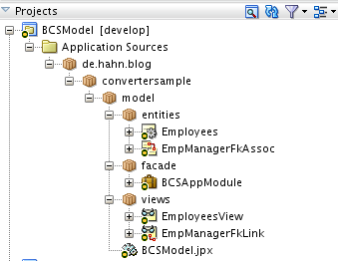
We don’t need to make any change to the generated project. This model project is only created to show that the converter works on data read from the DB table too.
ViewController Project
For users interested in more details about converters, please read the doc at http://docs.oracle.com/cd/E48682_01/web.1111/b31973/af_validate.htm#BABGIEDH. To start with the converter, we create a java class in the ViewController project and name it MyB2ZConverter.java. As package we choose ‘de.hahn.blog.convertersample.view.converter’

As the class will be a converter we have to implement the javax.faces.convert.Converter interface. For this you click on the green ‘+’ sign and can search for the right interface

This process will create the java class and two methods

These are the methods we have to implement for our use case. The first method ‘getAsObject’ is called when the data from the UI is send to the server for further processing. The ‘getAsString’ method is called when data from a storage (DB, bean property or pagedef variable) is going to be rendered to the UI.
As our use case is to exchange every “B” with the string “-Z-” we can implement the getAsString method easily by replacing every “B’ with “-Z-”. The method has three parameters, the current FacesContext which you can use to write messages, the UIComponent for which the converter is called and finally an Object representing the data which we want to convert. The result of the conversion must be a String. The resulting method look like
/** Method to get the string representation of hte object to use in the UI
* @param facesContext current facesContext
* @param uIComponent component which was used to deliver the data
* @param object data from storage to be converted
* @return sting to use for in the UI
*/
public String getAsString(FacesContext facesContext, UIComponent uIComponent, Object object) {
  if (object != null) {
    String ret = object.toString().replaceAll("B", "-Z-");
    return ret;
  } else {
    return null;
  }
}
After the check if the object to convert is null (in this case there is nothing to do), we use the String.replaceAll(…) method to search for ‘B’ and replace it with “-Z-”.
Keep in mind that the first parameter to the replaceAll method is a regular expression (see String.replaceAll(java.lang.String, java.lang.String)).
Now, if the data from the UI is send back to the model layer, it has to be converted back into the original format. So we have to do the conversion backwards by replacing all “-Z-” with “B” in the getAsObject(…) method:
/** Method which get the data from a uiComponent and should return it in the format we like to store in the DB (or elswhere)
* @param facesContext current facesContext
* @param uIComponent component which was used to deliver the data
* @param string data from the ui component
* @return object to use for further work (e.g. storage in the DB)
*/
public Object getAsObject(FacesContext facesContext, UIComponent uIComponent, String string) {
  if (string != null) {
    String ret = string.replaceAll("-Z-", "B");
    return ret;
  } else {
    return null;
  }
}
The result will be an Object which will be passed back to the model layer. If you don’t implement the getAsObject(…) method and just return the third parameter as resulting object, you would change every data in the back end to the new format. This may be your intention, but most often you don’t want to do this. It would mark every row of data dirty you have visited without any user interaction. This is because you pass different data back to the model than you read from it.
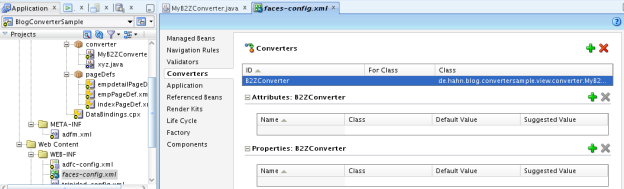
The last step to do is to register the custom converter in the faces-config.xml file of the ViewController project. Open the faces-config.xml file in JDev and select the ‘Converter’ tab

Click the green ‘+’ sign to get the an empty row in the converter section. Go to the property window and you see

Where we click on the ‘…’ button on the right end of the ‘Class’ field. We get the search for a class dialog where we look for the MyB2ZConverter class

Select the class and enter an ID fro the converter. This ID will be used in the UI to tell a component to use this converter.

Finally the converter section look like
UI Page
Now we can use the converter in a page or fragment. We start with a simple page where we define a inputText field and a button to submit the content of the field to see the converter working.
In the adfc-config.xml we add a JSPX page named ‘index’

And this page uses a quick layout as seen here

We add a title and the inputText field, a button to submit the data and two outputText fields to show what the converter has done to the data. The page layout looks like

or in code

If you like to copy the code use the following representation:
<?xml version='1.0' encoding='UTF-8'?>
<jsp:root xmlns:jsp="http://java.sun.com/JSP/Page" version="2.1" xmlns:f="http://java.sun.com/jsf/core" xmlns:h="http://java.sun.com/jsf/html"
 xmlns:af="http://xmlns.oracle.com/adf/faces/rich">
 <jsp:directive.page contentType="text/html;charset=UTF-8"/>
 <f:view>
 <af:document id="d1">
 <af:form id="f1">
 <af:panelStretchLayout topHeight="50px" id="psl1">
 <f:facet name="top">
 <af:outputText value="Converter Sample" id="ot1" inlineStyle="font-size:x-large;"/>
 </f:facet>
 <f:facet name="center">
 <af:panelGroupLayout layout="scroll" xmlns:af="http://xmlns.oracle.com/adf/faces/rich" id="pgl1">
 <af:inputText label="Enter String" id="it1" value="#{bindings.myInput1.inputValue}">
 <f:converter converterId="B2ZConverter"/>
 </af:inputText>
 <af:commandButton text="refresh" id="cb1"/>
 <af:outputText value="current data: #{bindings.myInput1.inputValue}" id="ot2"/>
 <af:outputText value="current data with converter: #{bindings.myInput1.inputValue}" id="ot3">
 <f:converter converterId="B2ZConverter"/>
 </af:outputText>
 <af:commandButton text="Converter with DB Data" id="cb2" action="emp"/>
 </af:panelGroupLayout>
 <!-- id="af_one_column_header_stretched" -->
 </f:facet>
 </af:panelStretchLayout>
 </af:form>
 </af:document>
 </f:view>
</jsp:root>
Hint: you might notice another component, a button which is later used to navigate to a second page. This is described later.
For the inputText field we need to store the data a user enters. For this we can either use a DB table, a bean property or a pagedef variable. We use a pagedef variable (more on see see Creating Variables and Attribute Bindings to Store Values Temporarily in the PageDef) which we bind to the value property of the inputText component (value=”#{bindings.myInput1.inputValue}”). The converter is setup by adding an f:converter tag like
<af:inputText label="Enter String" id="it1" value="#{bindings.myInput1.inputValue}">
  <f:converter converterId="B2ZConverter"/>
</af:inputText>
The converterId points to the ID defined in the faces-config.xml file. Running the page will show

Enter ‘Hello’ into the field and clicking outside the field (so that it looses the focus) will show

As we see, the two outputText fields don’t show anything as the data in not submitted jet. Clicking the ‘refresh’ button submits the data and the converter goes to action

Well, as the input did not have any ‘B’ nothing changes. So lets us add another word ‘Beta’ and click outside the inputText

As we did not submit the data to the server, we still see ‘Hello Beta’ and the outputText fields show ‘Hello’ both. Now click the ‘refresh’ button to get
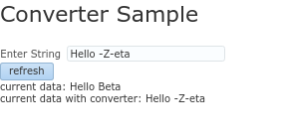
The inputText has changed to the new format where the “B” is exchanged with the “-Z-”, however the outputtext ‘current data’ still shows the ‘Hello Beta’. The reason for this is that the data send to the binding layer was converted back using the getAsObject(…) method which exchanged the “-Z-” with “B”.
This implements the use case described at the beginning.
Now, to show that the same converter works with data from a DB table as well we add another two pages to the adfc-config.xml. One showing the employees in a read only table with a link on the employeeId which navigates to the employee details in a form.

The navigation to the second use case is done with the button mentioned earlier (‘Converter with DB data’)

Clicking on the button will show a table with employees where the EMail column was used to add the converter

The column tag looks like
<af:column sortProperty="#{bindings.EmployeesView1.hints.Email.name}" filterable="true" sortable="true"
    headerText="#{bindings.EmployeesView1.hints.Email.label}" id="c3">
  <af:outputText value="#{row.Email}" id="ot5">
    <f:converter converterId="B2ZConverter"/>
  </af:outputText>
</af:column>
Like with the inputText we just add a f:converter tag with the right ID “B2ZConverter”. With this use case we see why the getAsObject(…) method should undo the formatting. You don’t want to store the Email like this. You only want to show it this way, but not overwrite the correct Email fro the employee. You can check the DB data and see that the Email is still stored with the “B” and not the “-Z-”

To verify this we can click the link in the first column to goto the detail page of the selected employee

Again, we see the ‘Email’ in the new format and the original data ‘NO CONVERTER Email’ in the normal data. The tags used for this are
  <af:inputText value="#{bindings.Email.inputValue}" label="#{bindings.Email.hints.label}" required="#{bindings.Email.hints.mandatory}"
      columns="#{bindings.Email.hints.displayWidth}" maximumLength="#{bindings.Email.hints.precision}"
      shortDesc="#{bindings.Email.hints.tooltip}" id="it1">
    <f:validator binding="#{bindings.Email.validator}"/>
    <f:converter converterId="B2ZConverter"/>
  </af:inputText>
  <af:panelLabelAndMessage label="NO CONVERTER #{bindings.Email.hints.label}" id="plam1">
    <af:outputText value="#{bindings.Email.inputValue}" id="ot2"/>
  </af:panelLabelAndMessage>
When using the binding for the Email without the converter we see the data as it’s stored in the DB. Using the converter we see the converted data.
The sample was build with JDeveloper 11.1.1.17.0 using the HR DB schema. You can download the sample from GitHub BlogConverterSample.zip
