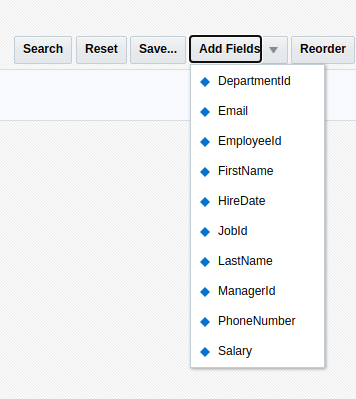
A couple of weeks ago a question in the Oracle ADF Community asked for help with af:query in advanced mode. In detail, the user wanted to know how to hide some fields from the ‘Add Fields’ LOV available in the advanced mode of the af:query component.
You can hide fields declaratively in the view criteria the af:query. For this, you uncheck the queryable checkbox for the attribute. If you do this for e.g. the CommissionPct attribute
You don’t get this field when you click on the add button
But you don’t see the field also.
A field that is hidden this way cant be used in the query.
Use Case
The use case is to hide the field only from the list of fields to add. This is useful if you only want the field in the query once.
Solution
A look at the documentation reveals that there isn’t any property to do this, I didn’t find one at least.
The solution that I’m showing here is to use CSS to hide the field from the list that is built by the af:query component when you click the add fields button.
How to find what to hide?
Well, before we can hide something with CSS, we need to find out what to hide. First thing to try is to use a skin selector. However, when I looked into this, I did not find any skin selector that could be used for this. All selectors available for the af:query component are used for different things.
Before we start looking into skin and or CSS, we disable content compression to see the real selector names by setting a context parameter in the web.xml file
When we run the application after that, we can use any browsers development tools and look at the generated HTML code (here I use Chrome):
The blue marked part shows the markup for the ‘Email’ in the popup of the ‘Add fields’ button. The task is to hide this EMail from the add Fields list but to let it be available in the list of fields on the left.
Now that we found the right element, we can hide it simply by setting the CSS
display : none;
to it.
Well, it’s easy to do in the browser development tools, but how to do it in the application?One way would be to create a skin selector for the class
‘af_commandMenuItem af_commandMenuItem-menu-item’
but this would change all components using this skin.
My solution is to add the CSS directly to the JSF page using an af:resource tag like
The trick is to use CSS to address the right element. You can look up all available selectors e.g. at w3schools.com.
We are looking for a tr element that has a specific id and can use the selector shown in line 6 in the image above.
Running the application with this CSS added to the page results in
The Email field is still present once, but it can’T be added again as it is not visible in the list of fields to add.
The one disadvantage using this technique is that we have to specify the element by its name. This is not dynamic but a fixed value. Ich you add another query to the page you gen another id and you have to change the CSS.
In the end, it’s your decision if you use this technique, but I guess it is a valid one for this special use case.
You can download the sample application from GitHub. The application was built using JDeveloper 12.2.1.4 and uses the HR DB.
One of the new notable features in JDeveloper 12.2.1.4 is an extension to the af:panelFormLayout component that allows a responsive behavior of the component.
af:panelFormLayout before 12.2.1.4
The image above shows the typical af:panelFormLayout. Actually we see two af:panelFormLayout:
At the top, we see an af:panelFormLayout where we can alter the layout with the af:selectOneChoice. This we use to investigate the new setting
The one at the bottom that just shows the old af:panleFormLayout without any change. This is just there to better see the difference
In the image above both look the same. There is no responsiveness in either panelFormLayout. If the browser window gets smaller than the needed size for the two columns you get
We see that the label now takes two rows, but the inputText components in the second column are clipped.
Changes for 12.2.1.4
JDeveloper 12.2.1.4 added a new property ‘layout’, that changes this behavior to make the component more responsive to changes in the width of the window size.
The new property can have one of three possible values:
Weighted: this is the default. It will size the panelFormLayout to the size to the content and then break the labels if the space gets too small.
Fixed: will size to the width of the screen and truncate the labels and fields
Responsive: will auto arrange the fields in multiple columns and manage labelAlignment based on the space available for the panel
Weighted layout
As this is the default layout (and the only one before 12.2.1.4) we skip this here.
Fixed layout
The image above shows the difference between ‘fixed’ layout (top part) and ‘weighted’ layout (bottom part). Reducing the width of the screen will result in
Still not what we call responsive.
Responsive layout
OK, let’s look at the ‘responsive’ property. If the container width if big enough, it almost looks like the ‘fixed’ layout (see image below).
When the width is reduced the labels are arranged above the input field, which quite an improvement over the weighted layout.
When the width is reduced further, the multi-column layout is reduced to a one-column layout
By default, ADF defined three points or width where the layout changes. These points are defined in the skin and can be changed by altering the skin
af|panelFormLayout {
  -tr-panel-size-sm: 768;
  -tr-panel-size-md: 1024;
  -tr-panel-size-lg: 1281; /* anything greater than this is xl */
}
If you need different points where the layout should change, you can easily change the skin and define different style classes for different scenarios.
The REST part in the documentation still shows some pictures showing the ‘Custom Method’ tab for a REST resource
However. Searching the documentation for ‘custom method’ doesn’t show any result.
Defining a public custom method in the employee’s view and adding it to the client interface (only then methods are visible from the outside)
Looking at the same dialog in JDeveloper 12.2.1.4 does not show the ‘custom method’ tab 😦
So, is the documentation correct?
NO, a hint from @JDeveloper in a tweet gives a hint on this.
Methods are exposed by default!
But how to find them?
Well, let’s try the ‘describe’ operation on the VO using the URL ‘http://127.0.0.1:7101/BlogAdfRestMethod-RESTWebService-context-root/rest/v0/Employees/describe’. This will return plenty of information about the REST API. There we find the information about the Method ‘getVersionInfo’ which I wrote as a custom method in the EmployeesViewObjectImpl class.
To see the method in the REST API, the method must be part of the client interface. This is what the tweet means by ‘updating the metadata’, I guess.
Now, to call the method we use a POST request with the content type set to ‘application/vnd.oracle.adf.action+json’ as noted in the description of the method. The body of the POST request is set to
{
    "name" : "getVersionInfo"
}
Sending the request will give us
I added another method to the EmployeesViewObjImpl method
Named ‘sayHello’. This method I did not expose to the client interface. As we see in the description, this method is not exposed in the REST API. After exposing the method to the client interface too, we get this method in the REST API too.
Now, the description lists
So, the new method can be called via REST too
You can download the sample application from GitHub BlogAdfRestMethod. The sample was built using JDeveloper 12.2.1.4 and uses the HR DB schema.
The new JDeveloper 12.2.1.4 has added an enhancement an a new feature to the af:chooseDate component. We are looking at both in this article.
Enhancement
The enhancement is that you can now set a default date which is shown as the selected date when the field you show the af:chooseDate for is empty. In the older JDeveloper versions, the selected date was always the current date. The image below shows the situation of how the af:chooseDate component looks like:
The af:inputText ‘Datum’ is not set and because of this, the af:chooseDate shows the current date (when I took the picture) as the selected date. Problem is, that there are use cases where you don’T want the current date to be the selected date, e.g. your use case might want to show the next Friday after the current date as the selected date. This was not easily possible.
Now, the enhancement to the af:hcooseDate component allows us to set a default date via the property ‘defaultValue’. When set to a literal value, this will be parsed as “yyyy-MM-dd hh:mm:ss” or “yyyy-MM-dd”.
I added an af:inputdate ‘Set DefaultDate’ to allow selection of a date which then will be used as the default date in the af:chooseDate for the ‘Datum’ field. The current date is marked with gray and the date set in the ‘Set Default Date’ is shown as the selected date.
As you see, the ‘Datum’ field is still empty. If you select a date like ‘12/20/2019’ you get
The af:chooseDate component has another feature added. Now you can select multiple dates at once. This feature is very handy as you can now use one af:chooseDate to get a start date and an end date or date ranges. The image below shows the component with multiple dates selected.
The interesting thing is, that there is no implementation for this hardcoded in the component. Meaning is that we, the developers, need to implement this feature ourselves. For this ADF provides two new client events ‘load’ and ‘dateSelection’ that are triggered by the af:chooseDate component. We use these client events to implement the multi-select feature. The load event can be used to pass an array of dates to the component which are then shown as selected. This event is triggered when the component loads, as the name implies. The dateSelection event is triggered each time a user selects a date. It passes information about the keyboard state so that we can handle range selection.
To make it easier, the ADF Rich Client Demo has a sample implementation of the needed JavaScript code which I used as the base of my implementation:
/**
 * Shows a popup from an "action" type event.
 * @param {AdfActionEvent} actionEvent the event being handled
 */
var dates = [];
var minDate;
var maxDate;

function dateSelectionEventHandler(event) {
    var eventSource = event.getSource();
    var selectedDate = event.getSelectedDate();
    var modifier = event.getModifiers();

    if (modifier.indexOf(AdfRichChooseDate.MULTI_SELECTION) !=  - 1) {
        dates.push(selectedDate);
    }
    else if (modifier.indexOf(AdfRichChooseDate.RANGE_SELECTION) !=  - 1) {
        if (!minDate || (minDate.getTime() > selectedDate.getTime())) {
            minDate = selectedDate;
        }
        if (!maxDate || (maxDate.getTime() < selectedDate.getTime())) {
            maxDate = selectedDate;
        }
        var timeDiff = Math.abs(maxDate.getTime() - minDate.getTime());
        var diffDays = Math.ceil(timeDiff / (1000 * 3600 * 24)) + 1;
        dates = []
        for (var i = 0;i < diffDays;i++) {
            var selDate = new Date(minDate.getFullYear(), minDate.getMonth(), minDate.getDate() + i, 0, 0, 0, 0);
            if (!eventSource.isDisabled(selDate))
                dates.push(selDate)
        }
    }
    else if (modifier.indexOf(AdfRichChooseDate.SINGLE_SELECTION) !=  - 1) {
        minDate = null;
        maxDate = null;
        dates = []
        dates.push(selectedDate)
    }
    eventSource.setSelectedDates(dates);
}

function chooseDateLoadEventHandler(event) {
    var eventSource = event.getSource();
    eventSource.setSelectedDates(dates);
}

function processSelectedDates(event) {
    component = event.getSource();
    AdfCustomEvent.queue(component, "processSelectedDates",
    {
        payload : dates
    },
    true);
    event.cancel();
}
There are three JavaScript funtions:
dateSelectionEventHandler(event) handles the selection of one or more dates
chooseDateLoadEventHandler(event) handles the inital load of hte component and allows us to set dates as selected
processSelectedDates(event) is the funtion which passes the selected dates to a server event
The functions are added to the af:chooseDate compponent as client listerner
The image below shows the selected dates once the button ‘Selected Dates’ is clicked.
This JavaScript function simply passes the array of selected dates as payload from the client to the server. There the dates are just stored in a bean variable. This variable is used to show the dates in an af:outputText.
The same works for a range selection as shown below
And after the button ‘Selected Dates’ is clicked we get
The sample can be downloaded from GitHub BlogChooseDate or directly as a zip. The sample is written using JDeveloper 12.2.1.4 and doesn’t use any DB connection.
The new JDeveloper 12.2.1.4 provides some new features and enhancements. In the next couple of posts we are going to investigate some of them.
We start with the af:panelTabbed component. There is an enhancement fro this component we all waited for a long time. Vertical stacked tabs with icons and text. This sounds like a small thing, but in earlier versions of ADF vertical stacked tabs could only show icons.
We are calling tabs vertical stacked, if the tab is on the left or right side of the panel. Horizontal stacked tabs are the ones at the top or the button of the panel.
Vertical Stacked Tab with Icons and Text
As said before, in earlier versions of ADF you needed to do a workaround to get tabs on the left or right showing an icon, text or both. You needed to create an icon from the icon, Text or icon with text and add it to the af:showDetailItem. The drawback was that you couldn’t just edit the text (e.g. correcting a spelling mistake) or had to generate different such icons for different languages along with some logic to exchange the icon according to the selected language.
The new af:panelTabbed has a new property ‘verticalTabMode‘ with two modes:
iconOnly this mode behaves like the old versions and only shows an icon defined for the af:showDetailItem
iconAndText this mode shows an icon and the text defined in the text property of the af:showDetailItem
af:panelTabbed with verticalTabMode=”iconOnly’af:panelTabbed with verticalTabMode=”iconAndText’
The images above show the af:panelTabbed with the new verticalTabMode. The sample application for this can be downloaded from GitHub BlogPanelTabbed. It does not use a DB connection and was built using JDeveloper 12.2.1.4.
An interesting question came up in the JDeveloper & ADF ODC space. A user asked how to display a button which shows a long text in multiple lines.
The image above shows an af:button with a longer text. If you don’t have enough space in your layout to show such a long text in a button, you can shorten the Text. If this is not a acceptable, one solution is to break the long text into multiple lines.
Think about an af:panelSplitter which should show the same button
but the space i for the left pane in the splitter s limited. The result will be that the text of the button can’t be read. In other layouts the button might overflow the given space. his can crumble your whole page layout.
In this blog I’ll show you how to design a button which can handle this situation by showing the text in multiple lines. The green dotted rectangles shows the size of the layout container. This is for information only.
As you see in the image above, the text of the button breaks into multiple lines if the space is not wide enough to show it in one line. If we move the splitter to the right you see the effect
Solution
The solution is to create a style class for the button which we use for button which should be able to show their text in multiple lines. This style class is put into a skin to make it available to the ADF application.
The usage of the style class is simple as we see in the sample code for the af:panelSplitter
<af:panelSplitter id="ps1" splitterPosition="100" orientation="horizontal" dimensionsFrom="parent">
	<f:facet name="first">
	        <af:button text="This Button has a very long text to show" id="b3"/>
        </f:facet>
        <f:facet name="second">
                <af:button text="This Button has a very long text to show" id="b4"
                           styleClass="multiLineButton"/>
        </f:facet>
</af:panelSplitter>
You can download the sample BlogMultilineButton (or the zipped workspace) from GihHub. The code was developed using JDeveloper 12.2.1.3 and doesn’t use a DB connection.
In part one, showed how to implement a SQL IN clause in ADF. Now I show how to use this technique in a ViewCriteria or directly in a query of a view object.
We have to solve a couple of problems before we can really use the technique from part one in a ViewCriteria. As you know, when using a ViewCriteria, you select an operator which in turn is translated into SQL code. So, we have to find a way to create a new operator which will then be used to create the needed SQL code.
The technique to do this comes from an older post. Please look at Extending ViewCriteria to use SQL CONTAINS where I showed the basics on how to do this. The older post was designed for JDeveloper 11.1.2.1.0. Using the current JDeveloper version 12.2.1.3 give some ways for improvement of the earlier code.
The first improvement is that JDeveloper 12.2.1.3 allows us to introduce custom operators to view criteria. In the older sample, I had to use the description field of the ViewCriteria to pass information which SQL to generate. Now we can define an operator named ‘IN’ and use it in the ViewCriteria like any other default operator.
The next problem is how to generate the SQL shown in part one when the new custom operator ‘IN’ should be used. One of the big advantages of ADF is reusability. We use a base class which extends from ViewObjectImpl and use this new base class in the project.
The base class is named BaseViewObjectForSqlInClause were we implement the needed method
public String getCriteriaItemClause(ViewCriteriaItem aVCI)
which gets called for each part or item of a ViewCriteria. See the code of hte base class below.
Base Class
public class BaseViewObjectForSqlInClause extends ViewObjectImpl {
    private static ADFLogger _logger = ADFLogger.createADFLogger(BaseViewObjectForSqlInClause.class);

    // comma-separated list of custom operators. Each custom operator muast have a ',' at the end as delimeter!
    private static final String CUSTOM_OPERATORS = "IN,";

    public BaseViewObjectForSqlInClause(String string, ViewDefImpl viewDefImpl) {
        super(string, viewDefImpl);
    }

    public BaseViewObjectForSqlInClause() {
        super();
    }

    /**
     * Check if a given criteria item tries to use an 'IN' operator using a bind parameter (comma seperated list of strings).
     * Create special SQL clause for 'IN' operator
     * @param aVCI Criteria item
     * @return where clause part for the criteria item
     */
    @Override
    public String getCriteriaItemClause(ViewCriteriaItem aVCI) {
        // we only handle the SQL 'IN' operator
        String sqloperator = aVCI.getOperator();
        // add comma to operator as delimiter
        boolean customOp = CUSTOM_OPERATORS.indexOf(sqloperator.concat(",")) >= 0;
        customOp |= sqloperator.indexOf("NVL") >= 0;
        if (customOp) {
            ArrayList<ViewCriteriaItemValue> lArrayList = aVCI.getValues();
            if (lArrayList != null && !lArrayList.isEmpty()) {
                // check if the criteria item has bind parameters (only the first if of interest here as the IN clause onlyallows one parameter)
                ViewCriteriaItemValue itemValue = (ViewCriteriaItemValue) lArrayList.get(0);
                if (itemValue.getIsBindVar()) {
                    // get variable and check if null values should be ignored for bind parameters
                    Variable lBindVariable = itemValue.getBindVariable();
                    Object obj = ensureVariableManager().getVariableValue(lBindVariable.getName());
                    boolean b = aVCI.isGenerateIsNullClauseForBindVariables();
                    if (b && obj == null) {
                        // if null values for bind variables should be ignored, use the default getCriteriaItemClause
                        return super.getCriteriaItemClause(aVCI);
                    }

                    try {
                        // we only handle strings data types for bind variables
                        String val = (String) obj;
                    } catch (Exception e) {
                        // the bind variabel has the wrong type! Only Strings are allowed
                        _logger.warning("Bind variabel for SQL " + sqloperator +
                                        " clause is not of type String! -> No custom SQL clause created! (Class: " +
                                        obj.getClass() + ", Content: " + obj + ", Variable: " +
                                        lBindVariable.getName() + ", View: " + this.getName() + ")");
                        String s = ":" + lBindVariable.getName() + " = :" + lBindVariable.getName();
                        return s;
                    }

                    // only handle queries send to the db
                    if (aVCI.getViewCriteria()
                            .getRootViewCriteria()
                            .isCriteriaForQuery()) {
                        String sql_clause = null;
                        switch (sqloperator) {
                        case "IN":
                            sql_clause = createINClause(aVCI, lBindVariable);
                            break;
                        default:
                            _logger.severe("Unknown custom operator '" + sqloperator + "' found! -> do nothing!");
                            break;
                        }

                        return sql_clause;
                    } else {
                        // bind variable not set or
                        // for in memory we don't need to anything so just return '1=1'
                        return "1=1";
                    }
                }
            }
        }

        return super.getCriteriaItemClause(aVCI);
    }

    private String createINClause(ViewCriteriaItem aVCI, Variable lBindVariable) {
        // start build the sql 'IN' where clause (COLUMN is the name of the column, bindParam the name of the bind variable):
        // COLUMN IN (SELECT regexp_substr(:bindParam,'[^,]+',1,level) FROM dual CONNECT BY regexp_substr(:bindParam,'[^,]+',1,level) IS NOT NULL
        // get flagg to create an sql where clause which ignores the case of the bind parameter
        boolean upper = aVCI.isUpperColumns();
        String sql_in_clause = null;
        StringBuilder sql = new StringBuilder();
        if (upper) {
            sql.append("UPPER(");
        }
        sql.append(aVCI.getColumnNameForQuery());
        if (upper) {
            sql.append(")");
        }
        sql.append(" ").append(aVCI.getOperator());
        sql.append(" (select regexp_substr(");
        if (upper) {
            sql.append("UPPER(");
        }
        sql.append(":");
        sql.append(lBindVariable.getName());
        if (upper) {
            sql.append(")");
        }
        sql.append(",'[^,]+', 1, level) from dual connect by regexp_substr(");
        if (upper) {
            sql.append("UPPER(");
        }
        sql.append(":").append(lBindVariable.getName());
        if (upper) {
            sql.append(")");
        }
        sql.append(", '[^,]+', 1, level) is not null)");
        sql_in_clause = sql.toString();

        _logger.finest("generated SQL-IN clause: " + sql_in_clause);

        return sql_in_clause;
    }
}
Using Base Class in Project
To use the base class in all new created ViewObjects of the project, we change the models project properties
Now, whenever you create a new ViewObject, the new base class is used and the SQL IN operator can be used in the VOs view criteria.
You can change any existing ViewObject to use the BaseViewObjectForSqlInClause by changing the extends clause in the class definition by hand.
Creating a ViewCriteria Using the Custom IN Operator
All pieces are in place and using the IN operator is pretty easy. We start by creating a new ViewObject named EmployeesOfDepartmentsViewCriteria
Now we have a ViewObject based on an EntityObject for the Employees. We need to make one change. The DepartmentId is an Integer type attribute, the comma-separated list is of type String (containing numbers). This doesn’t match. We add another attribute to the ViewObject of type String which we calculate from the DepartmentId Integer attribute. We change the SQL query for this by selecting the ‘Query’ node first unselecting the checkbox ‘Calculate Department Query at Runtime (recommended)’, second select the checkbox ‘Write Custom SQL’ and third add the line ‘to_char(Employees.DEPARTMENT_ID) DEPARTMENT_ID_STR,’ to the query.
Once this new ViewObject has been created, we add a ViewCriteria to it
If you like, you can turn off the checkbox ‘Ignore Case’ as it is not needed. The numbers are always lower case.
There have been numerous questions about how to implement a SQL IN clause in ADF using a viewCriteria since the begin of life of ADF. There are a couple of solutions e.g. using an SQL array type or a DB table to store the values of the IN clause.
I came up with another solution which was using Oracle DBs CATSEARCH function or even CONTAINS search index.
All those solutions are more or less complex and need some programming to implement.
The solution I present in this blog is easy and elegant. However, it has its limitations still. Anyway, for about 90% of the use cases, I know where you want to add an SQL IN clause it works perfectly.
Problem
The problem is that you can’t simply define an IN clause in a query or ViewCriteria like
Select * from Employees where employee_id in (:pListOfValues)
Using this select statement as a query for a view object will not throw an error, but it won’t get you the desired result.
If you use a String type parameter for ‘pListOfValues’, e.g. “100, 110, 200” the query in the VO would look like
Select * from Employees where employee_id in (“100,110,200”)
And return nothing as a result. It is easy to see why: the parameter is expanded as a string, not a list of numbers. If you think you could overcome this by converting the employee_id to a string it will still not work as “100” IN “100, 110, 200” still won’t work.
Solution
A very elegant way to solve this problem is to change the query or where clause to
SELECT * FROM TABLE
  WHERE COLUMN IN (
    SELECT regexp_substr(:pListOfValues,'[^,]+',1,level) FROM dual
      CONNECT BY regexp_substr(:pListOfValues,'[^,]+',1,level)
        IS NOT NULL)
The work is done by the select statement in the IN clause, This statement will split a comma-separated string in a series of values like a sub-select. If you run
SELECT regexp_substr(:pListOfvalues, '[^,]+', 1, level)FROM dualCONNECT BY regexp_substr(:pListOfvalues, '[^,]+', 1, level) IS NOT NULL
In a SQL worksheet and pass ‘11,12,15,17’ as ‘pListOfValues’ you get
You can pass any comma-separated string e.g. “1, hello, 444, world” and get
The SQL builds an internal table and add the values delimited by a comma to it. This internal table can then be used in the IN clause of another SQL statement.
Finally, running a complete query we can search e.g. for the employees which have the ID 100 or 110, or 180 or 176
In part 2, I’ll show how to implement this kind of query in a ViewCriteria of a ViewObject by adding a custom operator.
In this blog article, I show how to use a multi-select component as a filter in a table. The sample is based on an older sample from Frank Nimphius (98. How-to use multi select components in table filters). The sample was built for JDev 11g R1 and R2.
It works using 12c too, but you get deprecation warnings after the migration. A user on the JDeveloper & ADF forum asked if I could provide a sample running in 12c without the deprecation warnings.
I will only show how to rewrite the bean method which is called when the user enters one or more values in the filter. The remaining part of the original sample works without a change in 12c.
To better understand what I’m talking about I show some images from the original blog:
The image above shows the sample table. Below we see the multi-select component to filter for multiple departments:
Please read the original blog entry to understand how to build the UI. The remaining part of this blog covers how to build the custom query listener method.
are used which produce deprecation warnings in 12c
Starting from JDev 12.1.3 you can’t use the criteriaMap from the FilterableQueryDescriptor. Instead, you have to first get the ConjunctionCriterion from the FilterableQueryDescriptor and get the map of Criterion from it. The map holds the filter criteria entered by the user.
As you don’t use the criteria directly, you can’t set it back after generating the filter fro the multi-select. You work with the Criterion instead.
The new Method looks like
    /**
     * Custom Query Listener.
     * Applies af:selectMany choice values to the table filter criterion
     * @param queryEvent
     */
    public void onEmployeeTableQuery(QueryEvent queryEvent) {
        //user selected values
        ArrayList<Object> departmentIdArray = null;
        FilterableQueryDescriptor fqd = (FilterableQueryDescriptor) queryEvent.getDescriptor();

        //current criteria
        ConjunctionCriterion conjunctionCriterion = fqd.getFilterConjunctionCriterion();
        Map<String, Criterion> criterionMap = conjunctionCriterion.getCriterionMap();
        Criterion criterion = criterionMap.get("DepartmentId");

        //Translate DepartmentId array list to OR separate list of values
        StringBuffer deptIdFilterString = new StringBuffer();
        AttributeCriterion adfcriterion = null;
        // flag we set only if the DepartmentId filter is set (to reset the selection later)
        boolean flagDepIdFilter = false;
        if (criterion != null) {
            adfcriterion = (AttributeCriterion) criterion;
            Object object = adfcriterion.getValue();
            if (object != null) {
                flagDepIdFilter = true;
                departmentIdArray = (ArrayList<Object>) object;

                for (int argIndex = 0; argIndex < departmentIdArray.size(); argIndex++) {

                    //You need to know what is the underlying data type you are dealing
                    //with for the attribute. If you are on 11gR1 (11.1.1.x) then this
                    //type is jbo.domain.Number for numeric attributes.
                    //
                    //If you are on 11g R2 (11.1.2.x) this could be oracle.jbo.domain.Number,
                    //Integer or BigDecimal. If you use 11g R2, check the View Object for the
                    //attribute data type

                    if (argIndex == 0) {
                        //first argument has no OR

                        //this sample used oracle.jbo.domain.Number for the
                        //DepartmentId attribute
                        Number departmentId = (Number) departmentIdArray.get(argIndex);
                        deptIdFilterString.append(departmentId.toString());
                    } else {
                        //any subsequent argument is OR'ed together
                        deptIdFilterString.append(" OR ");
                        Number departmentId = (Number) departmentIdArray.get(argIndex);
                        deptIdFilterString.append(departmentId.toString());
                    }
                }
                //for some reasons, if in a single value select case, the
                //filter breaks and an error message is printed that the
                //String representation of the single value isn't found in
                //the list. The line below fixes the problem for filter values
                //that are positive numbers
                deptIdFilterString.append(" OR -1");
                String departmentIds = deptIdFilterString.toString();
                adfcriterion.setValue(departmentIds);
                fqd.setCurrentCriterion(adfcriterion);
            }
        }


        // preserve default query listener behavior
        //#{bindings.allEmployeesQuery.processQuery}

        FacesContext fctx = FacesContext.getCurrentInstance();
        Application application = fctx.getApplication();
        ExpressionFactory expressionFactory = application.getExpressionFactory();
        ELContext elctx = fctx.getELContext();

        MethodExpression methodExpression =
            expressionFactory.createMethodExpression(elctx, "#{bindings.allEmployeesQuery.processQuery}", Object.class,
                                                     new Class[] { QueryEvent.class });
        methodExpression.invoke(elctx, new Object[] { queryEvent });

        //restore filter selection done by the user. Note that this
        //needs to be saved as an ArrayList
        if (flagDepIdFilter) {
            adfcriterion.setValue(departmentIdArray);
            fqd.setCurrentCriterion(adfcriterion);
        }
    }
From the FilterableQueryDescriptor we get the ConjunctionCriterion and from this the map of Criterion. This map holds all filter values entered by the user in the filter of the table. We retrieve the one for the ‘DepartmentId’ and check if the value for it is not null. In this case, the criterion holds an array of the selected DepartmentId. From this array, we build a new string where we use the ‘OR’ operator to concatenate the array values.
Once this string is built, we set it back to the Criterion and execute the original query listener
You can download the sample from GtHubBlogMultiSelectComponentFilterTable for inspection and/or testing. The sample was built using JDev 12.2.1.3 and uses the HR DB schema.
In one of my current bigger ADF projects (yes, there are still big ADF projects!) I had a problem with the ‘executeWithParams’ operation binding called from a bean. To understand the problem I first give a brief description.
Problem
We have a special string column in some of our VOs. For this column, there is a bind parameter which is added to the where clause of the VO. Getter and setter for this bind parameters are generated to be able to set this parameter safely. In the setter method, some checks are done and special formatting is applied to the passed value.
Now we used the VOs executeWithParams operation to create a search form. Hitting the button to execute the query gave us a wrong result. As it turned out, that the execWithParams operation passes the parameters to the VO but it doesn’t use the getter/setter methods for the parameter. The parameters are directly set into the slots by the VariableManager.
Solutions
We want to transform or convert the given parameter right in the query. This way the developer doesn’t need to think about or to remember that there should be a transformation of the parameter. A central solution is preferred. Two solutions come to mind.
Expose a method in the VO
One solution would be to create a method in the VO and expose this method in the client interface of the VO. Then this method is visible in the binding layer and you can use call the method instead of using executeWithParams.
This works OK, but if a developer uses the executeWithParams method, you’ll still don’t get the right result.
Change the behavior of the executeWithParams method
I looked for a direct hook into the executeWithParams method but did not find one 😦
However, it turned out that the executeWithParam method calls the executeQuery method of the VO. At this point, the parameters are all set. This is done in the background via the VariableManager used in VOs to keep track of the bind parameters and their different type. There are where clause parameters and parameters used in view criteria. The latter are handled differently but this is not essential for this solution. All we need to know is that the parameters are correctly set when the executeQuery method is called.
The solution is to overwrite the executeQuery method of the view object (or use a base class) and check the parameters before executing the query.
Implementing the solution
In an earlier blog “Dump VO query and it’s parameter with their values” I showed how to get to the parameters defined for a VO and dump their values. Instead of writing the values to the log file, we look for the parameter, change the value, if one is given and then execute the query with the now converted parameter.
I use reflection to check if a setter method for a parameter is defined in the VO. If this is the case, I call the setter with the value set by the user. This way the setter is called when the query is called via the executeWithParams method. The code to change the parameter has only to be written once in the setter.
Below is the code:
    @Override
    public void executeQuery() {
        _logger.info("executeQuery");
        transformHistoryParameter();
        dumpQueryAndParameters();
        super.executeQuery();
    }

    private void transformHistoryParameter() {
        VariableValueManager vm = ensureVariableManager();
        Variable[] variables = vm.getVariables();
        // check each parameter for this query
        for (Variable var : variables) {
            String varName = var.getName();
            try {
                String mName = "set" + varName;
                Class mvarType = var.getJavaType();
                Method m = this.getClass().getMethod(mName, new Class[] { mvarType });
                // check if method is a setter method
                if (isSetter(m)) {
                    Object val = vm.getVariableValue(var);
                    m.invoke(this, val);
                }
            } catch (NoSuchMethodException e) {
                // nothing to do if there is no setter defined
                return;
            } catch (IllegalAccessException | InvocationTargetException e) {
                // nothing to do if there is no setter defined
                return;
            }
        }
    }

    public boolean isGetter(Method method) {
        if (!method.getName().startsWith("get")) {
            return false;
        }
        if (method.getParameterTypes().length != 0) {
            return false;
        }
        if (void.class.equals(method.getReturnType())) {
            return false;
        }
        return true;
    }

    public boolean isSetter(Method method) {
        if (!method.getName().startsWith("set")) {
            return false;
        }
        if (method.getParameterTypes().length != 1) {
            return false;
        }
        return true;
    }

    public void dumpQueryAndParameters() {
        // get the query in it's current state
        String lQuery = getQuery();
        // Dump query
        _logger.info("---query--- " + lQuery);
        //get Valriables
        AttributeList attributeList = getNamedWhereClauseParams();
        String[] attributeNames = attributeList.getAttributeNames();
        if (attributeNames == null || attributeNames.length == 0) {
            _logger.info("--- No variables found");
        } else {
            _logger.info("---Variables:");
            for (int ii = 0; ii < attributeNames.length; ii++) {
                Object lObject = attributeList.getAttribute(ii);
                _logger.info("  --- Name: " + attributeNames[ii] + " Value: " +
                             (lObject != null ? lObject.toString() : "null"));
            }
        }
    }
It was implemented using JDeveloper 12.2.1.3 and the HR DB schema.
To make it easy, I used the HR DB schema and built a query on the EMPLOYEES table:
A forth bind variable is introduced in a view criteria
The transformation uses the pMail bind parameter and makes it uppercase.
    /**
     * Returns the bind variable value for pMail.
     * @return bind variable value for pMail
     */
    public String getpMail() {
        String val = (String) getNamedWhereClauseParam("pMail");
        _logger.info("value: " + val);
        return val;
    }

    /**
     * Sets <code>value</code> for bind variable pMail.
     * @param value value to bind as pMail
     */
    public void setpMail(String value) {
        _logger.info("value:" + value);
        String newVal = value;
        if (value != null) {
            newVal = value.toUpperCase();
            _logger.info("Value transformed to " + newVal);
        }
        setNamedWhereClauseParam("pMail", newVal);
    }
I know that it would be easy to without this code by just setting the ‘ignore case’ flag when defining the query, but this is just a sample of a change of a parameter.
The data model in the application module looks like
Feb 08, 2019 3:05:38 PM de.hahn.blog.execwithparams.model.EmployeesViewImpl executeQuery INFO: executeQuery Feb 08, 2019 3:05:38 PM de.hahn.blog.execwithparams.model.EmployeesViewImpl setpMail INFO: value:ski Feb 08, 2019 3:05:38 PM de.hahn.blog.execwithparams.model.EmployeesViewImpl setpMail INFO: Value transformed to SKI Feb 08, 2019 3:05:38 PM de.hahn.blog.execwithparams.model.EmployeesViewImpl setpName INFO: value: null Feb 08, 2019 3:05:38 PM de.hahn.blog.execwithparams.model.EmployeesViewImpl setpDate INFO: value: null Feb 08, 2019 3:05:38 PM de.hahn.blog.execwithparams.model.EmployeesViewImpl dumpQueryAndParameters INFO: —query— SELECT Employees.EMPLOYEE_ID, Employees.FIRST_NAME, Employees.LAST_NAME, Employees.EMAIL, Employees.PHONE_NUMBER, Employees.HIRE_DATE, Employees.JOB_ID, Employees.SALARY, Employees.COMMISSION_PCT, Employees.MANAGER_ID, Employees.DEPARTMENT_ID FROM EMPLOYEES Employees WHERE ( ( ( ( Employees.LAST_NAME LIKE ( :pName || ‘%’) ) OR ( :pName IS NULL ) ) AND ( ( Employees.EMAIL LIKE ( :pMail || ‘%’) ) OR ( :pMail IS NULL ) ) AND ( ( Employees.HIRE_DATE >= :pDate ) OR ( :pDate IS NULL ) ) ) ) Feb 08, 2019 3:05:38 PM de.hahn.blog.execwithparams.model.EmployeesViewImpl dumpQueryAndParameters INFO: —Variables: Feb 08, 2019 3:05:38 PM de.hahn.blog.execwithparams.model.EmployeesViewImpl dumpQueryAndParameters INFO: — Name: pMail Value: SKI Feb 08, 2019 3:05:38 PM de.hahn.blog.execwithparams.model.EmployeesViewImpl dumpQueryAndParameters INFO: — Name: pName Value: null Feb 08, 2019 3:05:38 PM de.hahn.blog.execwithparams.model.EmployeesViewImpl dumpQueryAndParameters INFO: — Name: pDate Value: null Feb 08, 2019 3:05:38 PM de.hahn.blog.execwithparams.model.EmployeesViewImpl dumpQueryAndParameters INFO: — Name: pSalary Value: null
We see, that executeQuery() is called, then setpMail is called and the value given in the UI is converted to uppercase. In the dump of the query, we see that the uppercase parameter is used for the query.
The same works with the other view object in the application module. Just try it out yourself. The sample has a small UI project allowing you to test it in the browser too.